Kubernetes CI/CD with GitLab Runner and AWS ECR
Learn how to set up a seamless CI/CD pipeline to build, push, and deploy your app to Kubernetes using GitLab Runner and AWS ECR private registry
This is a continuation from my previous post Spinning up Kubernetes with K3s and Rancher, you can check that out. This guide works on any Kubernetes cluster, not just K3s.
Continuous Integration and Continuous Delivery (CI/CD) are essential tools to automate your application deployment pipeline, helping you deliver the latest stable version to clients quickly and reliably. There are many CI/CD tools available like Jenkins, Circle CI, Travis CI, and more. In this guide, we’ll use GitLab Runner, a minimal and lightweight CI/CD tool that integrates seamlessly with GitLab.
Most modern applications are containerized, with Docker being one of the most popular container platforms. Docker enables applications to run consistently across any environment. Container images need to be stored in a registry. In this tutorial, we’ll use AWS ECR (Elastic Container Registry) to store our application images. You can also use alternative registries such as Docker Hub, GitLab Container Registry, or others.
This guide covers best practices for integrating GitLab Runner with your Kubernetes cluster, along with secure integration with AWS ECR private registry using IAM Roles. You can use either self-hosted GitLab or the cloud version—I’m using a self-hosted GitLab instance. The goal is to trigger the GitLab Runner automatically whenever code is pushed to the main branch, which will then build the project, push the image to AWS ECR, and deploy the container to our Kubernetes cluster.
Prerequisites
- A running Kubernetes cluster
- Helm 3 installed
- AWS Console access with appropriate permissions
- GitLab account (self-hosted or GitLab.com)
Create Namespace
First, create a dedicated namespace for your projects. This would use accross all the manifest in this tutorial. Here I’m using development:
1
kubectl create namespace development
Make sure all the
namespacesin the Kubernetes manifests are the same (except for the GitLab Runner). This makes it easier to share the configurations and data across multipleKubernetes/kind, unless you specifically need to use differentnamespacesand know how to manage that.
Prepare IAM Role
We need to create an IAM Role to allow AWS ECR to be accessed from EC2 instances where Kubernetes is running.
1. Create AWS ECR Policy
First, let’s create a policy for AWS ECR. Navigate to IAM in AWS Console -> Policies (left sidebar) -> Create Policy.
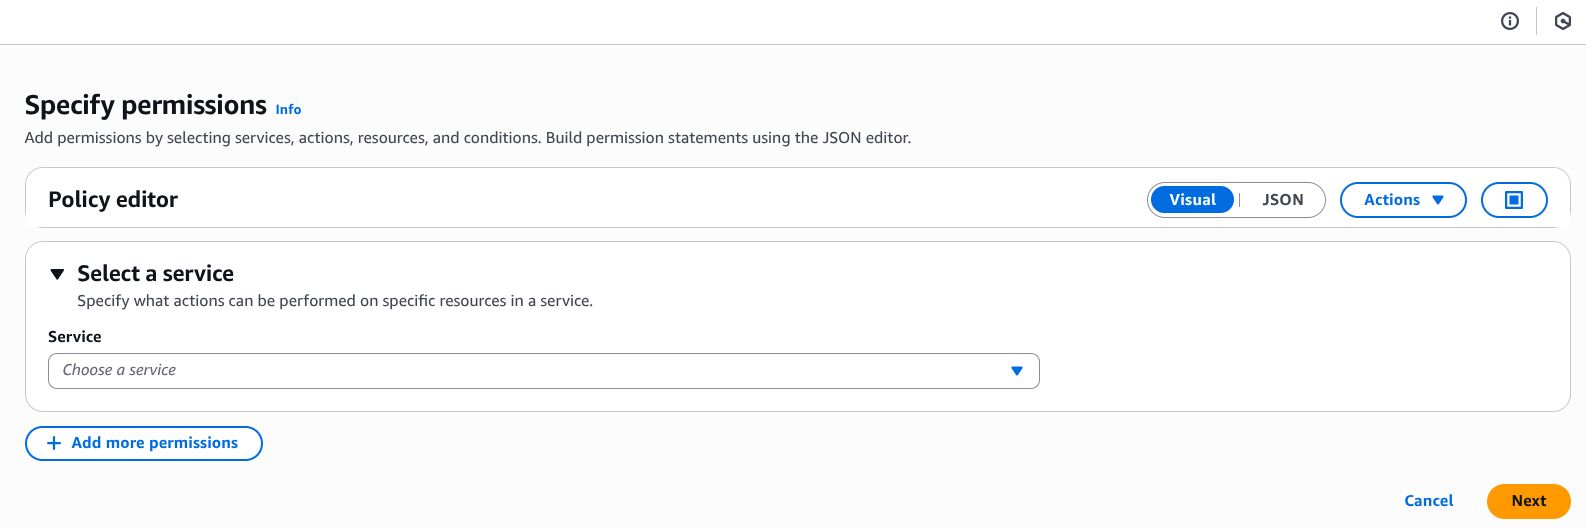
In the policy editor, switch to JSON mode and paste the following policy:
1
2
3
4
5
6
7
8
9
10
11
12
13
14
15
16
17
18
19
20
21
22
23
24
25
26
27
28
{
    "Version": "2012-10-17",
    "Statement": [
        {
            "Sid": "ECRRepositoryAccess",
            "Effect": "Allow",
            "Action": [
                "ecr:GetDownloadUrlForLayer",
                "ecr:BatchGetImage",
                "ecr:CompleteLayerUpload",
                "ecr:DescribeImages",
                "ecr:DescribeRepositories",
                "ecr:UploadLayerPart",
                "ecr:ListImages",
                "ecr:InitiateLayerUpload",
                "ecr:BatchCheckLayerAvailability",
                "ecr:PutImage"
            ],
            "Resource": "arn:aws:ecr:*:{ACCOUNT_ID}:repository/*"
        },
        {
            "Sid": "ECRAuthorizationToken",
            "Effect": "Allow",
            "Action": "ecr:GetAuthorizationToken",
            "Resource": "*"
        }
    ]
}
Important: Replace
{ACCOUNT_ID}with your AWS Account ID (e.g.,123456789012). You can find this in the top-right corner of the AWS Console.
Click Next, give your policy a descriptive name (I’m using AmazonECRPushPull), optionally add a description and tags, then click Create Policy.
2. Create IAM Role
Next, let’s create an IAM Role. Still in the IAM console, navigate to Roles (left sidebar) -> Create Role.
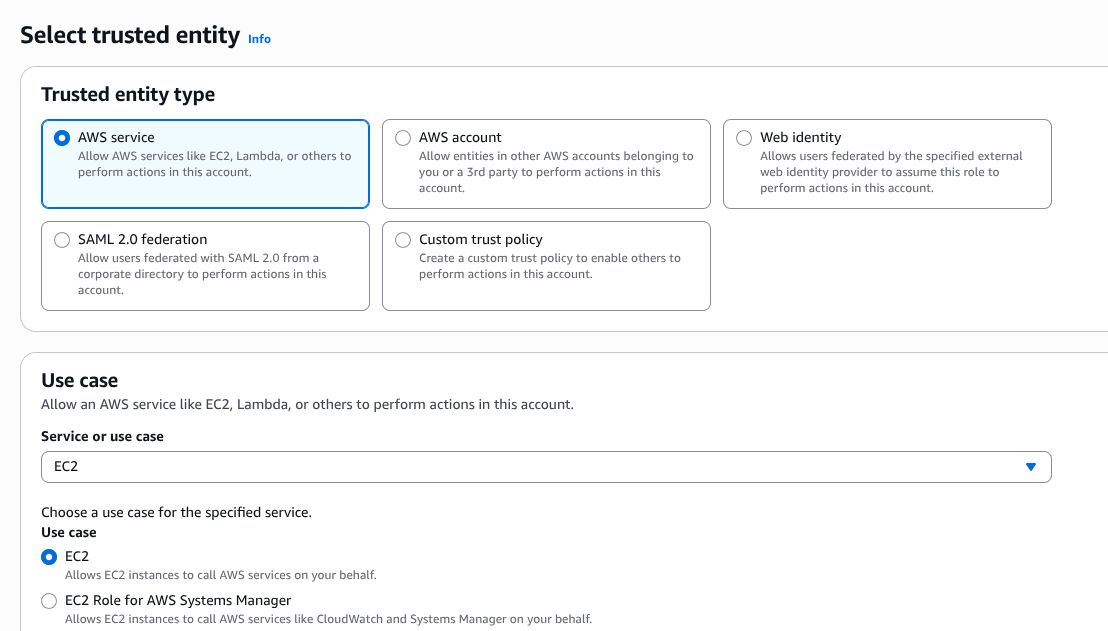
- Select AWS Service as the trusted entity type
- Choose EC2 as the use case
- Click Next
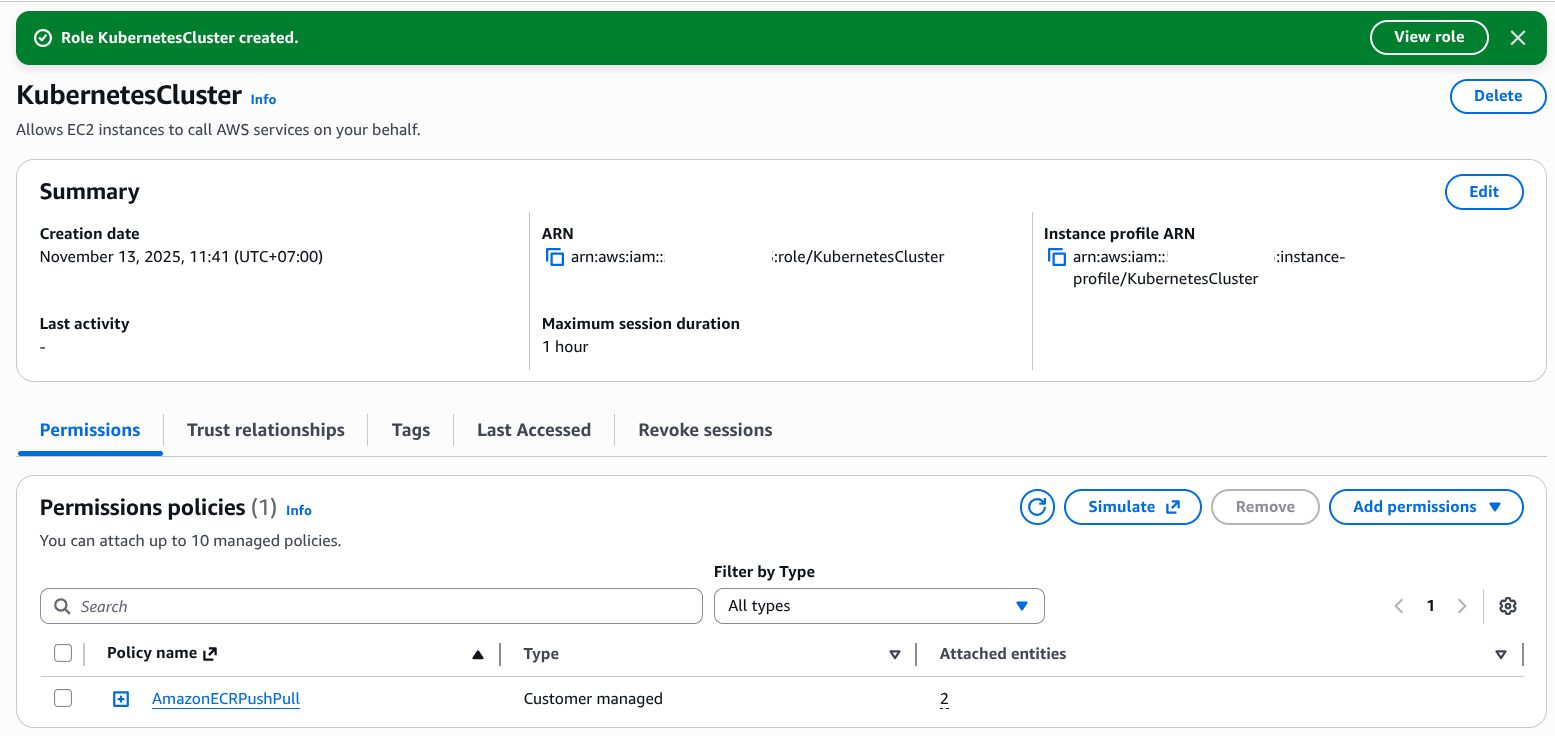
On the permissions page, search for the policy we just created (AmazonECRPushPull) and attach it to the role.
Click Next, provide a meaningful role name (I’m using KubernetesCluster), optionally add a description, then click Create Role.
3. Attach IAM Role to EC2 Instances
Now, attach the IAM Role to the EC2 instances where your Kubernetes cluster is running.
- Navigate to EC2 in the AWS Console
- Go to Instances (left sidebar)
- Select the EC2 instance(s) running your Kubernetes nodes
- Click Actions -> Security -> Modify IAM Role
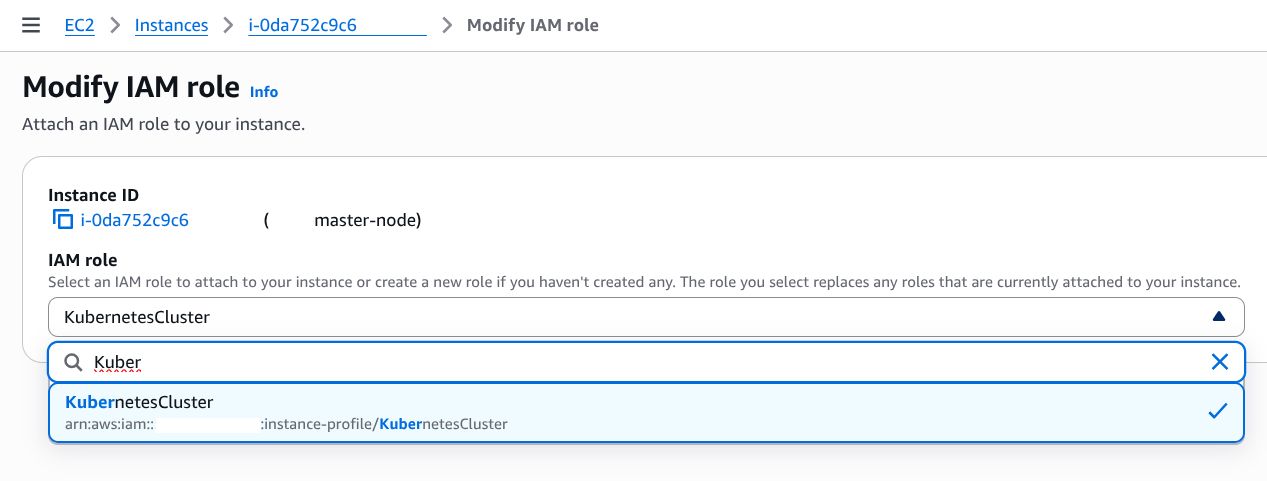
Select the IAM Role we just created (KubernetesCluster) and click Update IAM Role.
Note: If you have multiple master or worker nodes, attach this IAM Role to all EC2 instances in your cluster.
Prepare AWS ECR Authentication on Kubernetes
By default, AWS ECR requires authentication tokens even when using IAM Roles. The IAM Role we created grants permission to fetch authorization tokens. However, these tokens expire after 12 hours, so we need to automate the token renewal process using a Kubernetes CronJob.
1. Create Service Account and RBAC
Create a ServiceAccount with the necessary permissions to manage secrets:
1
2
3
4
5
6
7
8
9
10
11
12
13
14
15
16
17
18
19
20
21
22
23
24
25
26
27
28
29
30
31
kubectl apply -f - <<EOF
apiVersion: v1
kind: ServiceAccount
metadata:
  name: ecr-cred-helper
  namespace: development
---
apiVersion: rbac.authorization.k8s.io/v1
kind: Role
metadata:
  name: ecr-cred-helper
  namespace: development
rules:
- apiGroups: [""]
  resources: ["secrets"]
  verbs: ["get", "create", "delete", "patch"]
---
apiVersion: rbac.authorization.k8s.io/v1
kind: RoleBinding
metadata:
  name: ecr-cred-helper
  namespace: development
roleRef:
  apiGroup: rbac.authorization.k8s.io
  kind: Role
  name: ecr-cred-helper
subjects:
- kind: ServiceAccount
  name: ecr-cred-helper
  namespace: development
EOF
2. Create Initial Registry Secret
Kubernetes stores sensitive data like registry credentials in Secrets. We’ll use the docker-registry secret type:
1
2
3
4
5
kubectl create secret docker-registry ecr-secret \
  --docker-server={AWS_ACCOUNT_ID}.dkr.ecr.ap-southeast-3.amazonaws.com \
  --docker-username=AWS \
  --docker-password=$(aws ecr get-login-password --region ap-southeast-3) \
  --namespace=development
Explanation:
- Replace
{AWS_ACCOUNT_ID}with your actual AWS Account ID (e.g.,123456789012) - I’m using the Jakarta region (
ap-southeast-3). Change this to your preferred AWS region - The username is always
AWSfor ECR - The password is dynamically fetched using AWS CLI
- This secret is valid for 12 hours
3. Create ConfigMap for Renewal Script
Create a ConfigMap containing the script to renew ECR credentials:
1
2
3
4
5
6
7
8
9
10
11
12
13
14
15
16
17
18
19
20
21
22
23
24
25
26
27
28
29
30
31
32
33
34
35
kubectl apply -f - <<EOF
apiVersion: v1
kind: ConfigMap
metadata:
  name: ecr-update-script
  namespace: development
data:
  update.sh: |
    #!/bin/sh
    set -e

    # Install kubectl
    echo "Installing kubectl..."
    curl -LO "https://dl.k8s.io/release/\$(curl -L -s https://dl.k8s.io/release/stable.txt)/bin/linux/amd64/kubectl"
    chmod +x kubectl
    mv kubectl /usr/local/bin/

    # Fetch new ECR token
    echo "Fetching ECR authorization token..."
    TOKEN=\$(aws ecr get-login-password --region ap-southeast-3)

    # Delete old secret
    echo "Deleting old secret..."
    kubectl delete secret ecr-secret -n development --ignore-not-found=true

    # Create new secret
    echo "Creating new secret..."
    kubectl create secret docker-registry ecr-secret \
      --docker-server={AWS_ACCOUNT_ID}.dkr.ecr.ap-southeast-3.amazonaws.com \
      --docker-username=AWS \
      --docker-password="\$TOKEN" \
      --namespace=development

    echo "Secret updated successfully at \$(date)"
EOF
Important: Replace
{AWS_ACCOUNT_ID}with your AWS Account ID and adjust the region if needed.
Why use ConfigMap? If we embed the script directly in the CronJob, the ECR token gets cached and won’t refresh properly. Using a ConfigMap ensures the script executes fresh each time.
4. Deploy CronJob for Token Renewal
Finally, create a CronJob that runs every 11 hours to refresh the ECR token before it expires:
1
2
3
4
5
6
7
8
9
10
11
12
13
14
15
16
17
18
19
20
21
22
23
24
25
26
27
28
29
30
31
32
33
34
kubectl apply -f - <<EOF
apiVersion: batch/v1
kind: CronJob
metadata:
  name: ecr-cred-renew
  namespace: development
spec:
  schedule: "0 */11 * * *"  # Run every 11 hours
  successfulJobsHistoryLimit: 3
  failedJobsHistoryLimit: 3
  jobTemplate:
    spec:
      template:
        spec:
          serviceAccountName: ecr-cred-helper
          restartPolicy: OnFailure
          containers:
          - name: ecr-cred-renew
            image: amazon/aws-cli:latest
            imagePullPolicy: IfNotPresent
            command:
            - /bin/sh
            - -c
            - |
              sh /scripts/update.sh
            volumeMounts:
            - name: script
              mountPath: /scripts
          volumes:
          - name: script
            configMap:
              name: ecr-update-script
              defaultMode: 0755
EOF
Explanation:
- The CronJob runs every 11 hours (before the 12-hour token expiration)
- Uses the official AWS CLI image from Amazon
- Mounts the ConfigMap as a volume containing the renewal script
- Maintains history of the last 3 successful and 3 failed jobs for debugging
5. Verify CronJob Setup
Check if the CronJob was created successfully:
1
kubectl get cronjob -n development
You can manually trigger the job to test it:
1
kubectl create job --from=cronjob/ecr-cred-renew ecr-cred-test -n development
Check the job status:
1
2
kubectl get jobs -n development
kubectl logs -n development job/ecr-cred-test
Connecting GitLab Runner to Kubernetes
This step is straightforward compared to the previous ones. We’ll set up GitLab Runner at the group level for better reusability across multiple projects.
1. Get Runner Token
I recommend applying the runner at the Group level instead of specific projects. This approach is more efficient and allows you to share the same runner across all projects within the group.
Navigate to Groups (left sidebar) -> Open your group (create one if you don’t have it) -> Build (left sidebar) -> Runners -> New group runner.
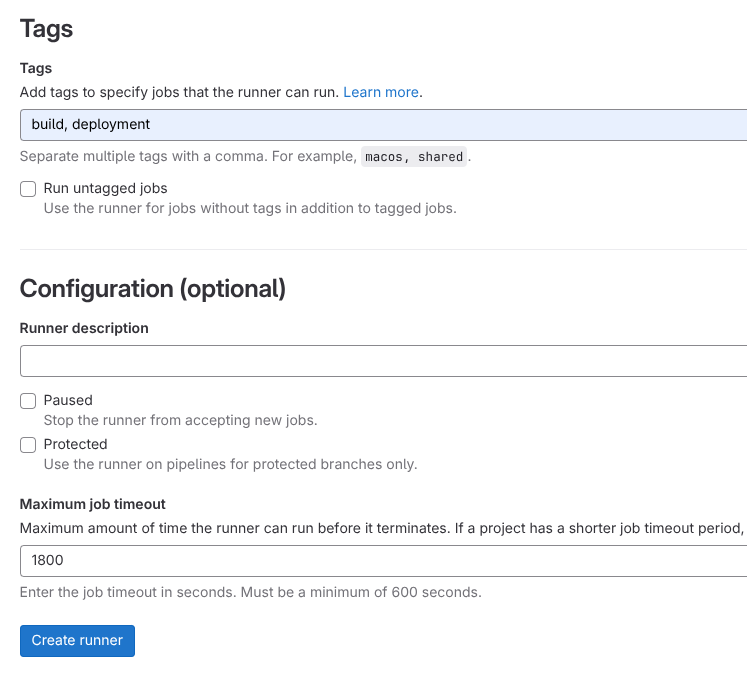
On the runner creation page:
- Specify the tags - I’m using
buildanddeployment - Set the timeout to
1800seconds (30 minutes) - Click Create Runner
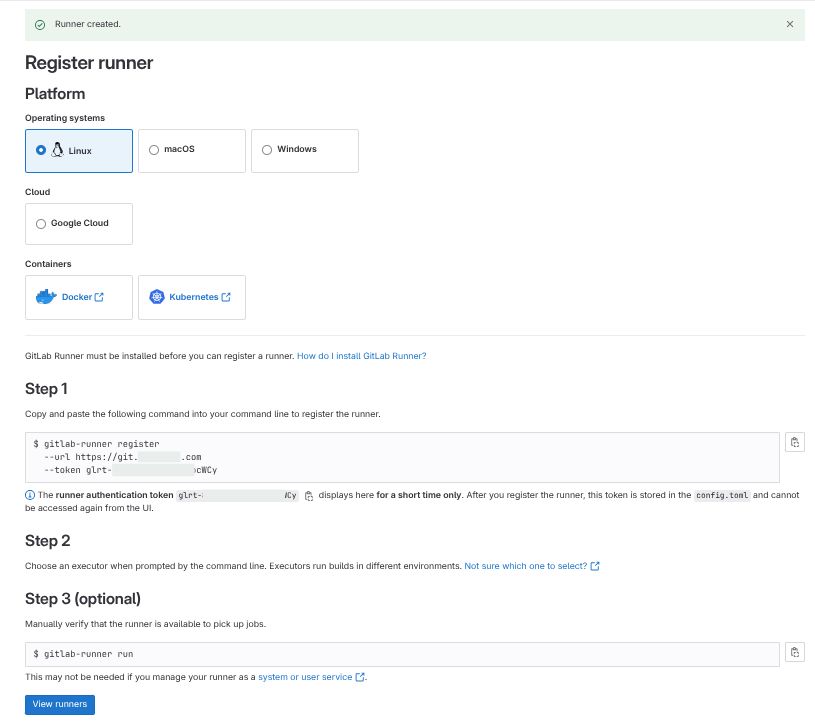
You’ll see a confirmation page with your runner token (starts with glrt-). Save both the URL and token for the next phase.
2. Deploy GitLab Runner on Kubernetes
We’ll deploy GitLab Runner using Helm. First, add the GitLab Helm repository:
1
2
helm repo add gitlab https://charts.gitlab.io
helm repo update
Create a custom helm values file for the GitLab Runner configuration:
1
nano gitlab-runner-values.yaml
Paste this helm values and update the necessary values:
1
2
3
4
5
6
7
8
9
10
11
12
13
14
15
16
17
18
19
20
21
22
23
24
gitlabUrl: {GITLAB_URL}
runnerToken: {RUNNER_TOKEN}

runners:
  config: |
    [[runners]]
      [runners.kubernetes]
        namespace = ""
        image = "docker:24-dind"
        privileged = true
        helper_image = "gitlab/gitlab-runner-helper:latest"
        node_selector = { "kubernetes.io/arch" = "amd64" }
      [[runners.kubernetes.volumes.empty_dir]]
        name = "docker-certs"
        mount_path = "/certs/client"
        medium = "Memory"

  tags: "build,deployment"

rbac:
  create: true

nodeSelector:
  kubernetes.io/arch: amd64
Explanation:
- Uses Docker-in-Docker (DinD) for building container images
- Replace
{GITLAB_URL}with your GitLab URL (e.g.,https://gitlab.com/or your self-hosted URL) - Replace
{RUNNER_TOKEN}with the token from the previous step - The
tagsmust match what you defined in GitLab (buildanddeployment) privileged: trueis required for Docker-in-Docker to work
Note: This configuration forces runner pods to run on
x86/amd64architecture. If you’re running on ARM-based nodes, changeamd64toarm64.
Deploy the GitLab Runner:
1
2
3
helm install gitlab-runner gitlab/gitlab-runner \
  -n gitlab-runner --create-namespace \
  -f gitlab-runner-values.yaml
Verify the installation:
1
2
3
4
5
# Check if pods are running
kubectl get pods -n gitlab-runner -o wide

# Check runner logs
kubectl logs -n gitlab-runner -l app=gitlab-runner
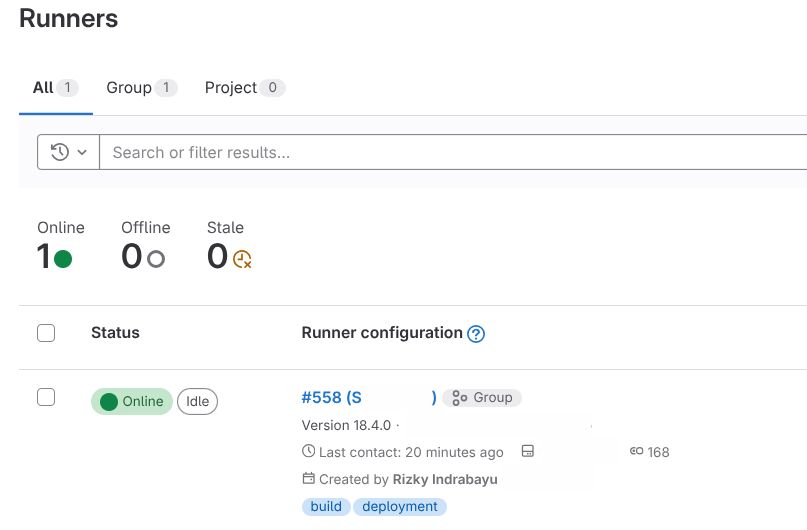
Return to GitLab and verify the runner shows as Online (green indicator).
3. Configure Kubernetes Access for Deployment
To enable deployments to your Kubernetes cluster, we need to configure KUBECONFIG as a CI/CD variable. This allows GitLab Runner to authenticate and deploy to your cluster.
a. Get KUBECONFIG
Extract the KUBECONFIG content with your master node’s IP address:
1
sudo sed 's/127.0.0.1/{MASTER_PRIVATE_IP}/g' /etc/rancher/k3s/k3s.yaml | base64 -w 0
Replace {MASTER_PRIVATE_IP} with your master node’s private IP address (available in your cloud dashboard). This command replaces the localhost address with the actual master node IP and encodes it in base64.
Tip: If you’re using a different Kubernetes distribution, replace
/etc/rancher/k3s/k3s.yamlwith your actual kubeconfig path (usually~/.kube/config).
Copy the entire encoded output (it will be a very long string).
b. Set KUBECONFIG on GitLab CI/CD Variable
Navigate to GitLab -> Your Group -> Settings (left sidebar) -> CI/CD -> Expand Variables
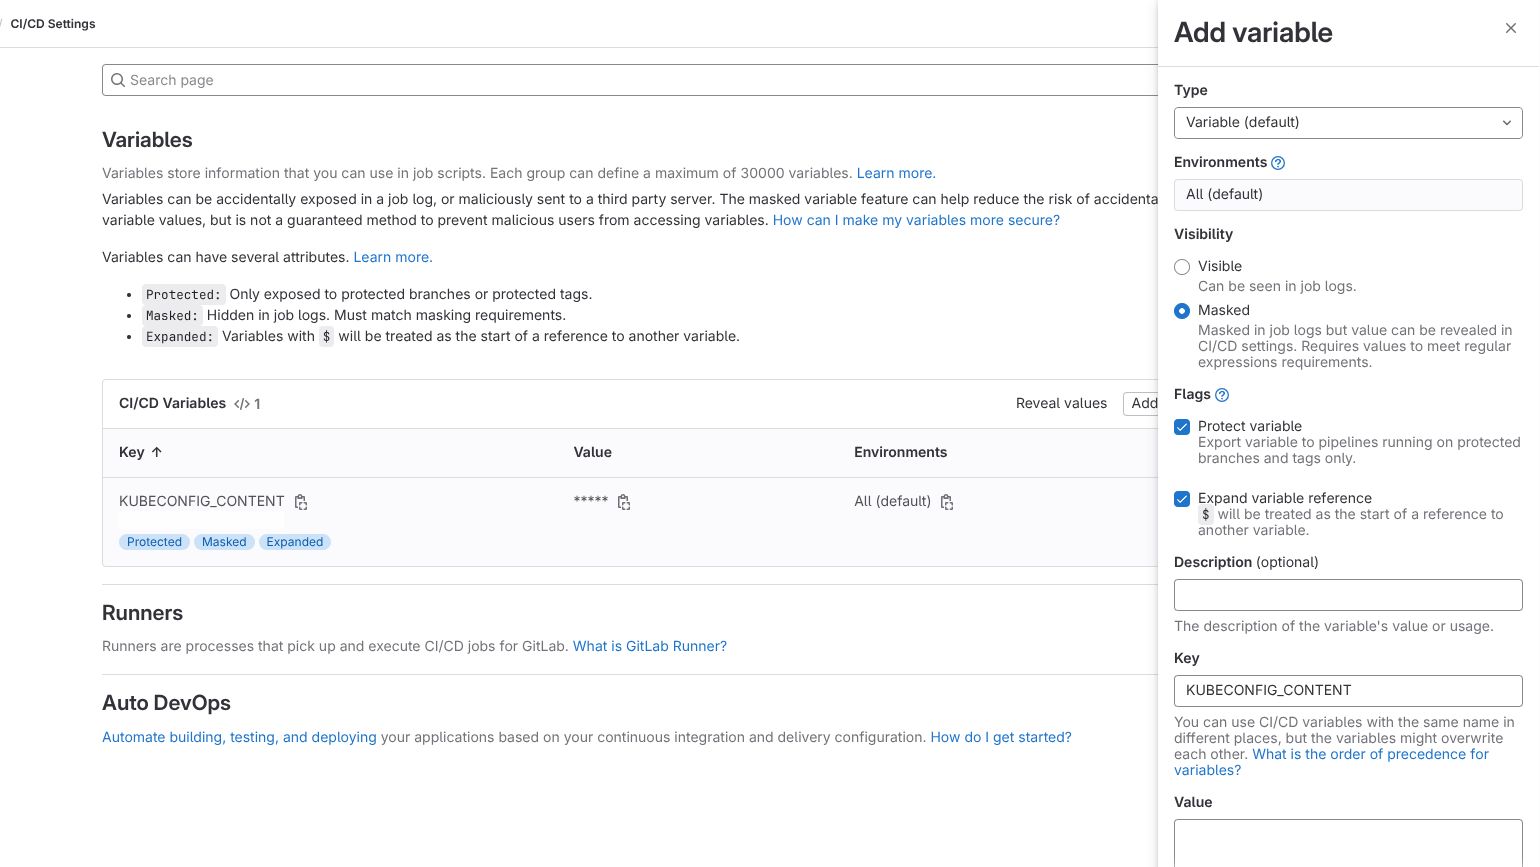
Click Add variable and configure:
- Key:
KUBECONFIG_CONTENT - Value: Paste the base64-encoded kubeconfig from the previous step
- Type: Variable
- Flags: Check Mask variable and Protect variable (recommended)
- Click Add variable
Let’s Try the CI/CD Pipeline
Now that everything is configured, let’s create a complete CI/CD pipeline. You’ll need two files in your project root: .gitlab-ci.yml for the pipeline definition and deployment.yaml for the Kubernetes manifest.
1. Create .gitlab-ci.yml
Create the CI/CD pipeline configuration:
1
2
3
4
5
6
7
8
9
10
11
12
13
14
15
16
17
18
19
20
21
22
23
24
25
26
27
28
29
30
31
32
33
34
35
36
37
38
39
40
41
42
43
44
45
46
47
48
stages:
  - build
  - deploy

variables:
  AWS_ACCOUNT_ID: <AWS_ACCOUNT_ID>
  AWS_REGION: "ap-southeast-3"
  ECR_REGISTRY: "${AWS_ACCOUNT_ID}.dkr.ecr.${AWS_REGION}.amazonaws.com"
  SERVICE: <SERVICE>
  NAMESPACE: development

build-and-push:
  stage: build
  image: docker:24
  services:
    - docker:24-dind
  tags:
    - build
  variables:
    DOCKER_TLS_CERTDIR: "/certs"
    DOCKER_HOST: tcp://docker:2376
    DOCKER_TLS_VERIFY: 1
    DOCKER_CERT_PATH: "$DOCKER_TLS_CERTDIR/client"
  before_script:
    - until docker info; do sleep 1; done
    - apk add --no-cache aws-cli
    - aws ecr get-login-password --region ${AWS_REGION} | docker login --username AWS --password-stdin ${ECR_REGISTRY}
  script:
    - docker build -t ${SERVICE} .
    - docker tag ${SERVICE}:latest ${ECR_REGISTRY}/${SERVICE}:latest
    - docker push ${ECR_REGISTRY}/${SERVICE}:latest
  only:
    - main

deploy:
  stage: deploy
  image: alpine/kubectl:latest
  tags:
    - deployment
  before_script:
    - mkdir -p ~/.kube
    - echo "$KUBECONFIG_CONTENT" | base64 -d > ~/.kube/config
  script:
    - kubectl apply -f deployment.yaml
    - kubectl rollout restart deployment/${SERVICE} -n ${NAMESPACE}
    - kubectl rollout status deployment/${SERVICE} -n ${NAMESPACE}
  only:
    - main
Explanation:
- Two-stage pipeline: Build stage creates and pushes Docker image to ECR; Deploy stage applies Kubernetes manifest
- Triggers: Only runs when code is pushed to the
mainbranch (adjust as needed) - Docker-in-Docker: Uses
docker:24-dindservice for building images inside the pipeline - ECR Authentication: Automatically logs into AWS ECR before building
Required Variable Changes:
<AWS_ACCOUNT_ID>- Your AWS account ID (e.g.,123456789012)<SERVICE>- Your Docker image or service name (e.g.,my-app). Must be match withdeployment.yamlbelow
2. Create deployment.yaml
This is just the Kubernetes manifest for your application, contains Kubernetes/kind like Deployment, Services, Ingress, and more. Below is the minimal version and just an example:
1
2
3
4
5
6
7
8
9
10
11
12
13
14
15
16
17
18
19
20
21
22
23
24
25
26
27
28
29
30
31
32
33
34
35
36
37
38
39
40
41
42
43
44
45
46
47
48
49
50
51
52
53
54
55
56
57
58
59
60
61
62
63
64
65
66
67
68
69
70
71
72
73
74
75
76
77
78
79
80
81
82
83
84
85
86
87
88
89
90
91
apiVersion: apps/v1
kind: Deployment
metadata:
  name: my-app
  namespace: development
  labels:
    app: my-app
spec:
  replicas: 2
  selector:
    matchLabels:
      app: my-app
  template:
    metadata:
      labels:
        app: my-app
    spec:
      imagePullSecrets:
        - name: ecr-secret
      containers:
      - name: my-app
        image: <AWS_ACCOUNT_ID>.dkr.ecr.ap-southeast-3.amazonaws.com/my-app:latest
        imagePullPolicy: Always
        ports:
        - containerPort: 8080
          name: http
          protocol: TCP
        env:
        - name: PORT
          value: "8080"
        - name: ENVIRONMENT
          value: "development"
        resources:
          requests:
            memory: "128Mi"
            cpu: "100m"
          limits:
            memory: "512Mi"
            cpu: "500m"
        livenessProbe:
          httpGet:
            path: /livez
            port: 8080
          initialDelaySeconds: 30
          periodSeconds: 10
        readinessProbe:
          httpGet:
            path: /readyz
            port: 8080
          initialDelaySeconds: 5
          periodSeconds: 5
---
apiVersion: v1
kind: Service
metadata:
  name: my-app-service
  namespace: development
spec:
  type: ClusterIP
  selector:
    app: my-app
  ports:
  - port: 80
    targetPort: 8080
    protocol: TCP
    name: http
---
apiVersion: networking.k8s.io/v1
kind: Ingress
metadata:
  name: my-app-ingress
  namespace: development
  annotations:
    kubernetes.io/ingress.class: "traefik"
    cert-manager.io/cluster-issuer: "letsencrypt"
spec:
  tls:
  - hosts:
    - my-app.example.com
    secretName: my-app-tls
  rules:
  - host: my-app.example.com
    http:
      paths:
      - path: /
        pathType: Prefix
        backend:
          service:
            name: my-app-service
            port:
              number: 80
Explanation:
- This service will running on internal port
8080 - Can be accessed through
HTTP:80via Traefik Ingress - Dont forget to change
<AWS_ACCOUNT_ID>andmy-appwith your actual values
INFO: By default, Kubernetes provides
livenessandreadinessprobes to monitor your pods. You can create endpoints to check your app’s health (/livezand/readyz). If your app goes down, the control plane can reschedule your app.
2. Push to Gitlab
Commit and push your changes to trigger the pipeline:
1
2
3
git add .gitlab-ci.yml deployment.yaml
git commit -m "Add CI/CD pipeline configuration"
git push origin main
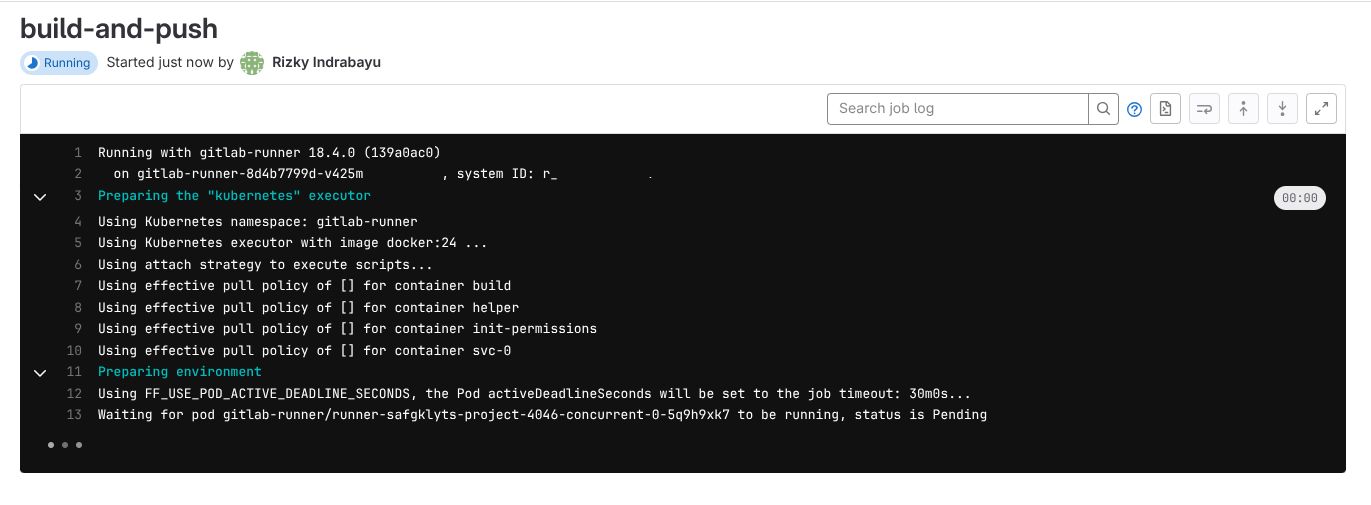
Navigate to your GitLab project -> CI/CD -> Pipelines to monitor the pipeline execution. Below is the example of Running (blue indicator) jobs on build tags. The Gitlab Runner waiting for our Kubernetes pods to be running for build-and-push stage.
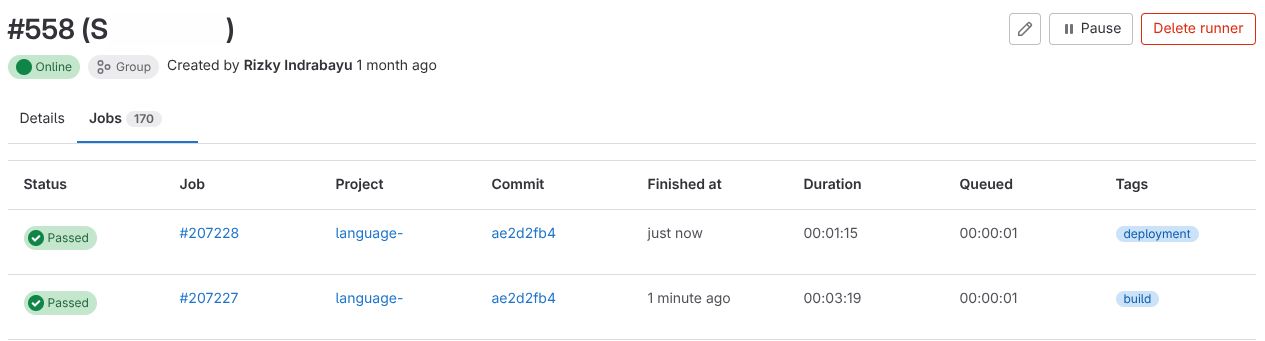
After pushing to the main branch, the Runner creates jobs for each stage. The pipeline shows:
- build-and-push stage: Builds Docker image and pushes to ECR
- deploy stage: Applies Kubernetes manifest and restarts deployment
If nothing errors, the jobs would shows Passed (green indicator). Meaning your stages are success. If there are errors, you can check the log message on your Jobs. Below is the example of success jobs
Conclusion
You’ve successfully set up automated AWS ECR authentication for your Kubernetes cluster using IAM Roles and CronJobs. This setup ensures your cluster can always pull images from your private ECR registry without manual token management.
You now have GitLab Runner successfully integrated with your Kubernetes cluster! The runner is configured to use AWS ECR credentials and is ready to execute CI/CD pipelines. With automated secret renewal in place, your pipeline will run smoothly without manual intervention.