Few-Shots Controlling AI Behavior
Controlling Behavior of AI/LLM using few-shots prompting
Introduction
When interacting with AI systems, we often face responses that fall short of expectations, be it misinterpretation, irrelevant answers, or even the wrong tool being invoked. These issues usually stem from insufficient guidance provided to the AI.
One powerful but underrated technique to mitigate this is Few-Shot Prompting. You might have unknowingly used it before, providing a few examples to steer AI behavior, but this article focuses on its intentional and structured use, especially in the context of AI applications, not just general ChatGPT conversations 😄.
Few-shot prompting is the practice of showing, not just telling. Instead of only providing instructions, you give the model several high-quality examples of inputs and their desired outputs. This conditions the AI to follow a specific pattern, tone, and logic, resulting in far more reliable and predictable behavior.
In this guide, we’ll explore two levels of few-shot prompting:
- System Prompt Level
- History Level
Let’s break them down with real-world AI application scenarios, especially around tool calling.
Few-Shot on AI Application
When you build applications powered by LLMs, you often connect them with various external tools: search APIs, databases, calendars, and more. Sometimes, even after giving the right instruction, the AI picks the wrong tool or formats the request incorrectly.
To handle this, you can structure few-shot examples into two different prompt levels:
1. System Prompt Level
The system prompt is your foundational instruction set for the AI. Typically set when initializing the conversation via API or tools like the OpenAI Playground or LangChain’s SystemMessage.
When building applications that use tools or have complex logic, embedding few-shot examples directly into the system prompt is the most robust way to control the AI’s core behavior.
By providing complete, example conversations, from user query to tool call to final answer, you teach the model the exact reasoning process you want it to follow. Using XML tags is a highly effective way to structure these examples, as modern LLMs are well-trained on this format.
Example
Imagine an agent with three tools:weather_tool and calendar_tool. Your goal is to ensure the AI always selects the right tool and responds in a consistent format. You can embed these examples directly in your system prompt.
1
2
3
4
5
6
7
8
9
10
11
12
13
14
15
16
17
18
19
20
21
22
23
24
25
26
27
28
29
30
31
32
33
34
You are a helpful personal assistant. Here are some examples of how to use your tools.

<conversation_1>
  <user>What’s the weather like in Tokyo tomorrow?</user>
  <assistant>Let me check the weather for Tokyo tomorrow.</assistant>
  <tool_call>
    <weather_tool>
      {"location": "Tokyo", "date": "tomorrow"}
    </weather_tool>
  </tool_call>
  <tool_output>
    <weather_tool>
      {"forecast": "28°C with light showers", "humidity": "65%", "wind": "10km/h"}
    </weather_tool>
  </tool_output>
  <assistant>The forecast for Tokyo tomorrow is 28°C with light showers, 65% humidity, and 10 km/h wind speed.</assistant>
</conversation_1>

<conversation_2>
  <user>Schedule a meeting with John next Monday at 10 AM.</user>
  <assistant>Sure, scheduling a meeting with John on Monday at 10 AM.</assistant>
  <tool_call>
    <calendar_tool>
      {"title": "Meeting with John", "datetime": "2025-07-21T10:00:00", "invitees": ["John"]}
    </calendar_tool>
  </tool_call>
  <tool_output>
    <calendar_tool>
      {"status": "success", "event_id": "evt_89127"}
    </calendar_tool>
  </tool_output>
  <assistant>The meeting with John has been successfully scheduled for next Monday at 10 AM.</assistant>
</conversation_2>
By including these complete flows, the AI learns the pattern: User Input → Thought → Tool Call → Tool Output → Final Answer. You can add as many examples as needed to cover various scenarios, but always be mindful of the model’s context window limitations.
Ensure the tool names and calling formats used in your few-shot examples match those defined in your actual tool setup. Inconsistencies may lead to unexpected tool selection or runtime failures.
2. History Level
The history level is a more dynamic approach. Instead of placing examples in the static system prompt, you prepend a predefined, static conversation to the user’s actual conversation history. This method is excellent for setting a specific tone or guiding the AI down a particular conversational path for the current session.
The key difference is that these examples are not part of the top-level instructions; they appear to the model as if they were a natural part of the ongoing chat. This is highly effective for tasks like maintaining a specific persona or following a question-answer format.
Example
Here’s a practical example using Python and the LangChain framework. We still follow the previous example tools: weather_tool and calendar_tool.
1
2
3
4
5
6
7
8
9
10
11
12
13
14
15
16
17
18
19
20
21
22
23
24
25
26
27
28
29
30
31
32
33
34
35
36
37
38
39
40
41
42
43
44
45
46
47
48
49
50
51
52
53
54
55
56
57
58
59
60
61
62
63
64
65
66
67
from langchain.chat_models import ChatOpenAI
from langchain.schema import (
    SystemMessage,
    HumanMessage,
    AIMessage,
    ToolMessage,
)
from langchain.prompts import ChatPromptTemplate, MessagesPlaceholder
from langchain.memory import ConversationBufferMemory
from langchain.chains import LLMChain

few_shots = [
		# Weather scenario
    HumanMessage(content="What’s the weather in Jakarta this Sunday?"),
    AIMessage(
        content="Let me check the weather in Jakarta for this Sunday.",
        tool_calls=[{
	        "id": 1,
	        "name": "weather_tool",
	        "args": {
		        "location": "Jakarta",
		        "date": "Sunday"
		      }
        }],
    ),
    ToolMessage(
        content='{"forecast": "32°C sunny", "humidity": "58%"}',
        name="weather_tool",
        tool_call_id=1,
    ),
    AIMessage(content="The forecast in Jakarta this Sunday is 32°C and sunny, with 58% humidity."),

		# Calendar scenario
    HumanMessage(content="Book a meeting with Alice at 2 PM tomorrow."),
    AIMessage(
        content="Sure, booking a meeting with Alice at 2 PM tomorrow.",
        tool_calls=[{
	        "id": 2,
	        "name": "calendar_tool",
	        "args": {
		        "title": "Meeting with Alice",
		        "datetime": "2025-07-21T14:00:00",
		        "invitees": ["Alice"]
		      }
				}],
    ),
    ToolMessage(
        content='{"status": "success", "event_id": "evt_124"}',
        name="calendar_tool",
        tool_call_id=2,
    ),
    AIMessage(content="The meeting with Alice has been scheduled successfully at 2 PM tomorrow.")
]

prompt = ChatPromptTemplate.from_messages([
    SystemMessage(content="You are a helpful personal assistant."),
    *few_shots,
    HumanMessage(content="{input}")
])

memory = ConversationBufferMemory(return_messages=True)
llm = ChatOpenAI(model="gpt-4")
chain = LLMChain(llm=llm, prompt=prompt, memory=memory)

response = chain.run(input="Send an email to Sarah reminding her about the project deadline.")
print(response)
Notice that in the previous example, we only included a simple system prompt:
“You are a helpful personal assistant.”
We didn’t add any explicit examples to the system prompt itself. Instead, the few-shot examples were injected directly into the conversation history. When using LangChain, this pattern is highly effective because the framework automatically mounts these few-shot examples before the user’s actual input, ensuring consistent context for the model without manual engineering.
This method serves as a great starting point, especially since LangChain seamlessly handles the formatting of messages to follow standard LLM API invocations.
Ensure the tool names and calling formats used in your few-shot examples match those defined in your actual tool setup. Inconsistencies may lead to unexpected tool selection or runtime failures.
What is The Main Difference?
Every time you interact with an LLM, whether through an API, a website interface, or other integrations, the underlying structure at the HTTP request level typically follows a consistent format: a JSON payload containing two main fields, ”system“ and ”messages” (See below).
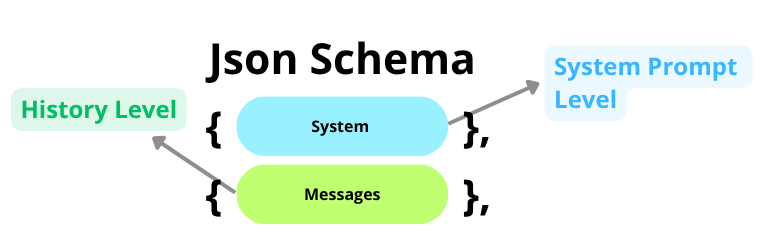
- The ”system” field holds the
System Prompt Level. This is where low-level (direct contact) instructions are placed, guiding the model’s identity, behavior, tone, and role throughout the interaction. It acts like the LLM’s “personality and rulebook”. - The ”messages” field holds the
History Level. This field contains a list of past user inputs, AI responses, and tool interactions. It reflects the dialogue history, allowing the LLM to understand context and continuity.
LLMs process the system prompt first, as it defines the rules and instructions, followed by the list of message history. This ordering impacts how the model interprets input and decides on the next action.
What if We Combining Both?
Combining both the System Prompt Level and the History Level approaches within the same examples or scenarios can lead to highly consistent and predictable LLM behavior. The model becomes much more likely to:
- Follow your logic and formatting precisely
- Select and use tools accurately
- Respond in your preferred tone and style
However, this comes with trade-offs. When the LLM is strictly bound to structured examples and tool usage patterns, its generative flexibility is reduced. This might be desirable in enterprise applications where control and safety are critical, but it may also limit creativity, reasoning, or adaptability.
Final Thoughts
Few-shot prompting is one of the most powerful techniques for controlling LLM behavior. Whether you’re building a chatbot, an agent-based system, or an AI assistant that interfaces with tools, few-shots serve as real-time programming instructions for the model.
You’re free to provide as many structured examples as needed to cover all the scenarios your app must support.
And yes, you still can combine both approaches:
- Place
Scenario Xin the system prompt level for global behavior. - Place
Scenario Yin the history level for contextual behavior.
This hybrid strategy enables you to create flexible, dynamic, and powerful AI applications that behave exactly the way you want them to.
Sources
- https://www.promptingguide.ai/techniques/fewshot
- https://docs.anthropic.com/en/docs/build-with-claude/prompt-engineering/use-xml-tags
- https://python.langchain.com/docs/how_to/few_shot_examples/