Create Your Own AI Assistant with Whisper and Llama 3.2
Automatic Speech Recognition (ASR) AI assistant with Text-to-Speech (TTS) modalities
Today, we will build an AI assistant capable of answering our questions by integrating a speech-to-text model called Whisper with a large language model (LLM) known as Llama.
Introduction
Artificial Intelligence (AI) has come a long way, enabling machines to interact with us in human-like ways. Today, we have advanced AI models that can handle multiple modalities, such as transforming speech into text and responding intelligently with speech.
In this guide, we’ll explore the creation of an AI assistant that combines speech recognition and text generation. Along the way, you’ll encounter a critical concept called quantization, which helps optimize AI models for better performance. If you’re new to quantization, I recommend checking out my blog for an introduction:
Speech Recognition
The first step in building our AI assistant involves speech recognition—the ability of an AI model to convert spoken words into text.
One of the most popular speech-to-text models is Whisper by OpenAI. Released as an open-source project, Whisper gained immense popularity in late 2023 and continues to be widely used today. It is known for its accuracy, multilingual capabilities, and robustness in real-world applications.
Text Generation Model
Once we have the text from the speech input, the AI assistant needs to process it and generate an intelligent response. This is where text generation models come in.
If you’re new to this field, these models can go by various names, including:
- Text Generation Models
- Auto-Regressive Models
- Causal Language Models
- Decoder-Only Models
Although these terms differ, they describe the same concept. These models work by predicting the next token (word or piece of a word) based on previous input. Unlike Encoder Models, which can look at the entire input (past and future), decoder-only models cannot “peek” into future tokens.
A prominent text generation model we’ll use is Llama. The latest version, Llama 3.2, is exceptionally powerful, capable of:
- Tool-calling: Interacting with external tools and APIs.
- Instruction Tuning: Training to follow human-provided instructions effectively.
- RLHF (Reinforcement Learning with Human Feedback): Enhancing responses based on human preferences.
In short, Llama 3.2 understands commands and questions with remarkable accuracy, making it perfect for our AI assistant.
Technicalities
This guide is designed to be user-friendly, guiding you step-by-step through the process. However, be aware that some steps may differ depending on your operating system (Windows vs. macOS). Pay close attention to the instructions specific to your platform to ensure a smooth experience.
A. Building Whisper Inference
To enable speech recognition for our assistant, we will use Whisper CPP, an efficient C++ implementation of OpenAI’s Whisper model proposed by Ggerganov. This implementation allows for fast inference and can run natively on your machine, leveraging hardware capabilities.
If you are using a macOS device with an M-series chip (e.g., M1, M2), Whisper CPP is highly optimized for you. It utilizes the Metal backend, which enhances performance on Apple silicon. As someone using an M1 chip myself, I can confirm its efficiency.
1. Install SDL2
This is important to read your speech through microphone driver, called Simple DirectMedia Layer 2 (SDL2)
1
2
3
4
5
6
7
8
9
# Install SDL2
# On Debian based linux distributions:
sudo apt-get install libsdl2-dev

# On Fedora Linux:
sudo dnf install SDL2 SDL2-devel

# Install SDL2 on Mac OS
brew install sdl2
2. Clone Repository
1
git clone https://github.com/ggerganov/whisper.cpp.git
Next, move up to Whisper CPP folder by:
1
cd whisper.cpp
and then build the C++ execution code (run one-by-one):
Mac OS
1
2
  cmake -B build -DWHISPER_SDL2=ON
  cmake --build build --config Release
Windows
1
2
  cmake -B build
  cmake --build build --config Release
Windows + Nvidia GPU
First, make sure you have installed
cuda: https://developer.nvidia.com/cuda-downloads1 2
cmake -B build -DGGML_CUDA=1 cmake --build build -j --config Release
B. Prepare Quantized Model
Using a quantized model improves performance by reducing model size and speeding up inference, especially on resource-limited devices. You can either convert a raw Whisper model to a quantized version or download a pre-quantized model. If you prefer to use the raw model, feel free to skip this section.
There are few options to get quantized model, you can start from convert it or just download the quantized-ready model.
Whisper: 1. Convert From HuggingFace
We will used the convert-h5-to-ggml.py from the Whisper CPP in the models directory.
Clone Official Whisper Repository
1
  git clone https://github.com/openai/whisper
Prepare the Model
Search your whisper preference model in HuggingFace that support your Language. I will give example using Indonesian Whisper Model by Cahya (cahya/whisper-medium-id). Below is the example using HuggingFace python pipeline to download it and saved it to the
models/whisper-iddirectory:1 2 3
from huggingface_hub import snapshot_download snapshot_download(repo_id='cahya/whisper-medium-id', local_dir="models/whisper-id")
Convert it to GGML model
Format Execution:
1
  python3 ./whisper.cpp/models/convert-h5-to-ggml.py [You HuggingFace Model] [Whisper] [Target Location]
Below is the example usage, you can specify based on your preferences location.
1
  python3 ./whisper.cpp/models/convert-h5-to-ggml.py ./whisper/models/whisper-id/ ../whisper ./models
Quantize
Format Execution:
1
  ./whisper.cpp/build/bin/quantize [Converted GGML Model] [Target Location] [Quantize Method]
Below is the example usage, you can specify based on your preferences quantization method (eg.
q4_0).1
whisper.cpp/build/bin/quantize ./whisper.cpp/models/ggml-model.bin ./whisper.cpp/models/ggml-medium-id-q4_0.bin q4_0
Whisper: 2. Using Pre-Quantized Model
The easiest way to use a quantized Whisper model is to download it directly from Hugging Face.
- Visit: Ggerganov’s HuggingFace Repository
- Choose your preferred quantization method. For faster inference, use a smaller model with
q5_1. - Download and place the model in the
whisper.cpp/modelsdirectory.
Llama 3.2
As mentioned earlier, we will use the Llama 3.2 model, specifically the Llama 3.2 1B Instruct model. This model is lightweight and can run on most devices. To enhance performance, we’ll use a quantized version of the model.
- Visit: Bartowski’s Hugging Face Repository.
- Select your desired quantization method (e.g.,
q4_K_M). - Download the model and place it in the
whisper.cpp/modelsdirectory.
C. Run AI Assistant
Now, for the final step, we’ll use the talk-llama inference script provided by Whisper CPP to run our AI assistant. This integrates the Whisper speech-to-text model with the Llama text generation model.
1. Build Talk-Llama
Lets move up to the build directory, make sure you are on the root folder of Whisper CPP:
1
cd ./build
and then build the talk-llama C++ execution code:
1
make talk-llama
2. Options for Talk-Llama
This C++ inference comes with several options usage. You can run the help mode like this:
1
./bin/talk-llama --help
Below is the results when we run it (full options from talk-llama):
1
2
3
4
5
6
7
8
9
10
11
12
13
14
15
16
17
18
19
20
21
22
23
24
25
26
27
28
29
30
usage: ./bin/talk-llama [options]

options:
  -h,       --help           [default] show this help message and exit
  -t N,     --threads N      [4      ] number of threads to use during computation
  -vms N,   --voice-ms N     [10000  ] voice duration in milliseconds
  -c ID,    --capture ID     [-1     ] capture device ID
  -mt N,    --max-tokens N   [32     ] maximum number of tokens per audio chunk
  -ac N,    --audio-ctx N    [0      ] audio context size (0 - all)
  -ngl N,   --n-gpu-layers N [999    ] number of layers to store in VRAM
  -vth N,   --vad-thold N    [0.60   ] voice activity detection threshold
  -fth N,   --freq-thold N   [100.00 ] high-pass frequency cutoff
  -tr,      --translate      [false  ] translate from source language to english
  -ps,      --print-special  [false  ] print special tokens
  -pe,      --print-energy   [false  ] print sound energy (for debugging)
  -vp,      --verbose-prompt [false  ] print prompt at start
  -ng,      --no-gpu         [false  ] disable GPU
  -fa,      --flash-attn     [false  ] flash attention
  -p NAME,  --person NAME    [Georgi ] person name (for prompt selection)
  -bn NAME, --bot-name NAME  [LLaMA  ] bot name (to display)
  -w TEXT,  --wake-command T [       ] wake-up command to listen for
  -ho TEXT, --heard-ok TEXT  [       ] said by TTS before generating reply
  -l LANG,  --language LANG  [en     ] spoken language
  -mw FILE, --model-whisper  [models/ggml-base.en.bin] whisper model file
  -ml FILE, --model-llama    [models/ggml-llama-7B.bin] llama model file
  -s FILE,  --speak TEXT     [./examples/talk-llama/speak] command for TTS
  -sf FILE, --speak-file     [./examples/talk-llama/to_speak.txt] file to pass to TTS
  --prompt-file FNAME        [       ] file with custom prompt to start dialog
  --session FNAME                   file to cache model state in (may be large!) (default: none)
  -f FNAME, --file FNAME     [       ] text output file name
3. Run Talk-Llama
Based on the option above, it comes with a lot of options. On the first run we can just use the -mw, -ml, and -p. I will give an another example later. Here are the structure:
1
./bin/talk-llama -mw [Whisper GGML directory] -ml [Llama GGUF directory] -p [Your name]
If you follow the previous step, note that I place the both Whisper and Llama model on whisper.cpp/models. You can adjust the directory if different. So lets continue:
1
2
./bin/talk-llama -mw ../models/ggml-model.bin -ml ../models/Llama-3.2-1B-Instruct-Q4_K_M.gguf
 -p Indrabayu
Next Level of AI Assistant
To enable a 2-way conversation, we can add a Text-to-Speech (TTS) model. This will allow the AI assistant to respond audibly to your queries. The implementation varies slightly depending on your operating system, so follow the instructions for your platform.
1. Text To Speech Model
Mac OS
For Mac OS, we can use the native TTS by Apple called
Say. You can find through System Setting → Accessibility → Spoken Content. You can choose your desired language and type of voices.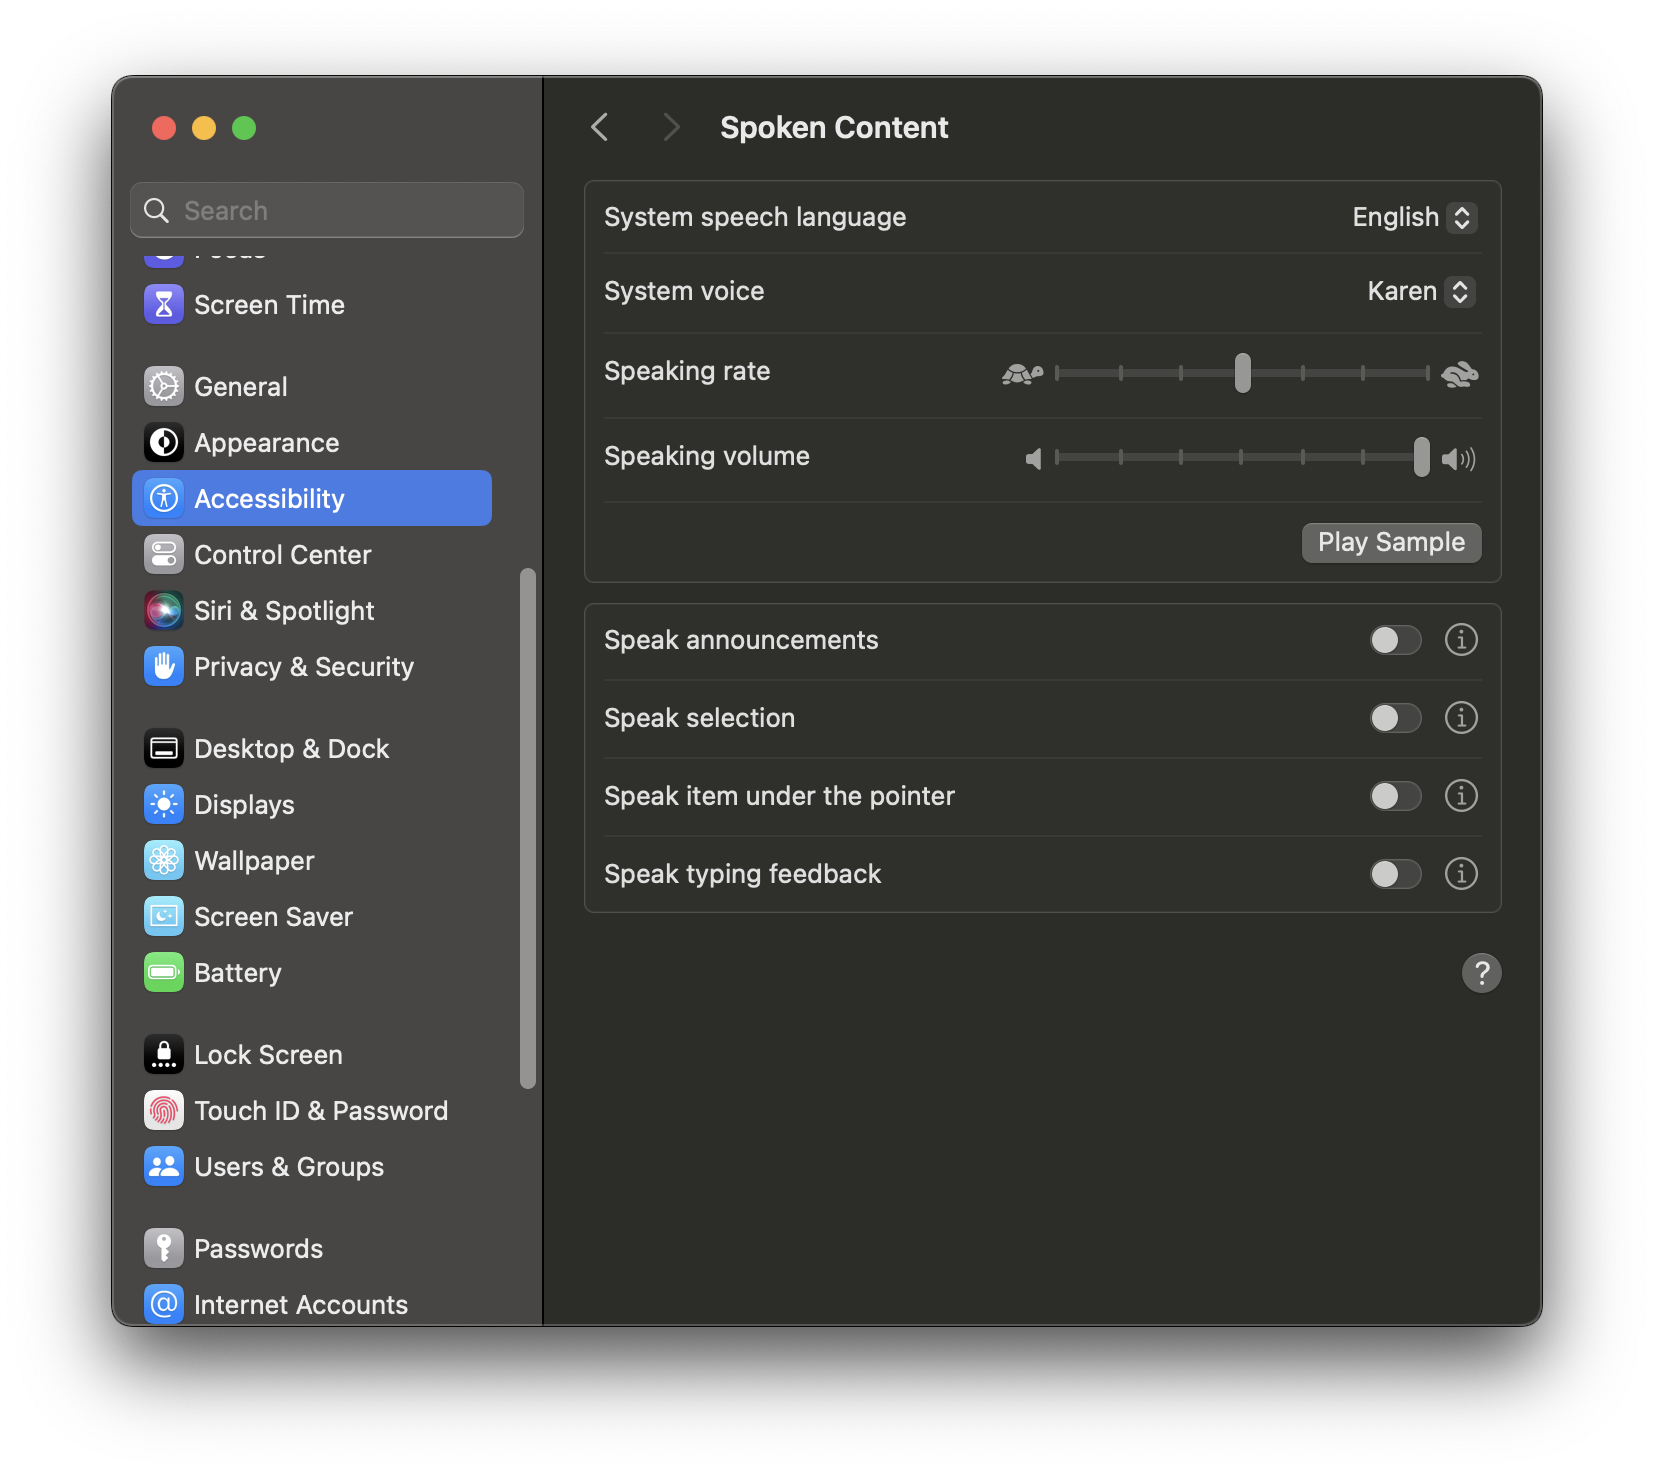
Windows
For Windows user you can install Piper TTS model and follow their guidance
2. Edit Speak File
Open speak file on the whisper.cpp/examples/speak and edit several code:
Mac OS
Before:
1
2
3
4
5
  ...

  # for Mac
  elif installed say; then
    say -f $2
Based on your chosen voice, we just need
System Voicename. For example I use “Karen” character. Just type-v [System Voice]:1 2 3 4 5
... # for Mac elif installed say; then say -v Karen -f $2Windows
Before:
1
2
3
4
  ...

  elif installed piper && installed aplay; then
    cat $2 | piper --model ~/en_US-lessac-medium.onnx --output-raw | aplay -q -r 22050 -f S16_LE -t raw -
You can do same like Mac OS before by adjust it based on the piper command
3. Run Talk-Llama Again
The script is same like before, we just add -s command:
1
2
./bin/talk-llama -mw ../models/ggml-model.bin -ml ../models/Llama-3.2-1B-Instruct-Q4_K_M.gguf
 -p Indrabayu -s ../examples/talk-llama/speak
English Version
Indonesian AI Assistant
For my Indonesian friends, you can build an AI assistant capable of understanding and processing the Indonesian language effortlessly.
1. Indonesian Whisper Model
Make sure you are using Indonesian Whisper model or Whisper Turbo V3, because it also support Indonesian Language. You can step back and follow the provided instructions.
2. Create Indonesian Prompt
First step, you can create prompt directory on the Whisper CPP. So make sure you are on the root folder of Whisper CPP and run this shell below:
1
mkdir prompt
Next, create .txt file named indonesian_prompt.txt:
1
touch prompt.txt
Finally, copy this Indonesian prompt into that file:
1
2
3
4
5
6
7
8
9
10
11
12
13
14
15
16
17
Transkrip percakapan tanpa akhir, di mana {0} berinteraksi dengan asisten AI bernama {1}.
{1} adalah asisten yang membantu, ramah, jujur, baik hati, dan selalu berhasil menjawab permintaan {0} dengan segera, detail, dan presisi.
Tidak ada anotasi seperti (30 detik berlalu...) atau (berbicara sendiri), hanya apa yang dikatakan {0} dan {1} satu sama lain.
Transkrip hanya mencakup teks, tidak termasuk markup seperti HTML atau Markdown.
{1} memberikan jawaban yang singkat dan jelas.

{0}{4} Halo, {1}!
{1}{4} Halo {0}! Ada yang bisa saya bantu hari ini?
{0}{4} Jam berapa sekarang?
{1}{4} Sekarang pukul {2}.
{0}{4} Tahun berapa sekarang?
{1}{4} Kita berada di tahun {3}.
{0}{4} Apa itu kucing?
{1}{4} Kucing adalah spesies mamalia kecil yang bersifat karnivora dan telah didomestikasi. Kucing adalah satu-satunya spesies domestik dalam keluarga Felidae.
{0}{4} Sebutkan sebuah warna.
{1}{4} Biru
{0}{4}
3. Indonesian TTS Model
You can follow the guide before to choose Indonesian TTS model. I will use “Damayanti” character and edit the speak file:
1
2
3
4
5
...

# for Mac
elif installed say; then
  say -v Damayanti -f $2
4. Run Talk-Llama
Once again, the script as same like before but adjust it little by adding -l, -s, and —prompt-file
1
2
./bin/talk-llama -mw ../models/ggml-medium-id-q4_0.bin -ml ../models/Llama-3.2-1B-Instruct-Q4_K_M.gguf
 -p Indrabayu -l id -s ../examples/talk-llama/speak --prompt-file ../prompt/indonesian_prompt.txt
Indonesian Version
Conclusion
Congratulations! You’ve successfully built your own AI Assistant capable of speech recognition, text generation, and even supporting two-way conversations. Whether you’re using it in English or Indonesian.